What's Changed?
Tonic Tutor looks a bit different, but for the most part it functions the same as it did before the update. We focused on simplifying and streamlining everything; our goal was to make the experience of using Tonic Tutor more intuitive and user friendly. Some of the changes are minor enough that we won't touch on them, but we've put all of the major changes here in one place so you can get an idea of what's new.
A Better Mobile Experience
People are increasingly using phones and tablets to access the internet, so offering a site that isn't clunky on smaller screens was the main reason we started working on an updated version of the site. The new version should be easier to use on all your devices, whether it's your desktop computer, your tablet or your phone. Some pages might look a little bit different on mobile, but our goal is to provide the same functionality and ease of use across the whole spectrum of devices.
Updated Menus
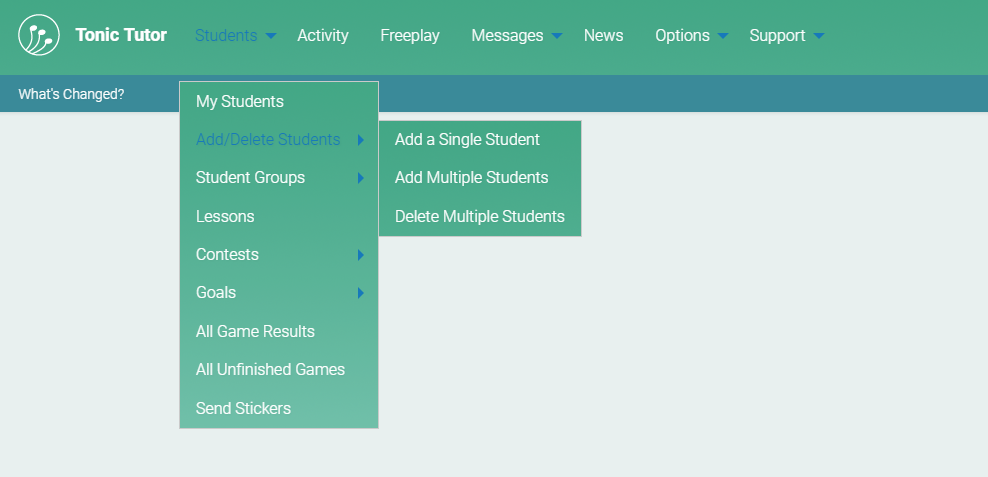
The menus are organized a bit differently, and they're a bit more compact, but they're mostly the same. The Students menu is similar to the main menu on the old version of the site: from there you can add and remove students and access contests and goals. It's the main hub where you manage your students. Freeplay is where you can test out the Freeplay versions of the games that students have access to after they finish their weekly lesson. Messages are largely unchanged. The Activity link replaces the old Events link, but it's essentially the same – just more compact. We've eliminated the sidebar, but we've created a News section where you can see what's been happening and what's coming in the future. The Support section is where you can contact us, look at the Frequently Asked Questions, and access some miscellaneous options and resources (including the options to export information on lessons, game settings and student results).
If you hover your cursor over a menu option (or tap if you're on a touch device), you'll see a full menu with options. If an option in the menu has an arrow next to it, that indicates that it contains an additional submenu you can access by hovering or tapping. For example, the Contests option in the Students menu will display the option to create a contest or view all of your contests.
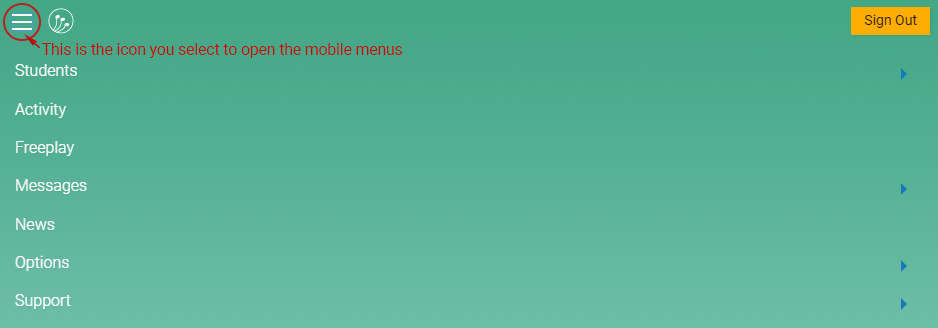
If you're on a mobile device, the menu is displayed a little bit differently. The menu is hidden by default, but you can open it selecting the menu icon (which is three parallell lines).
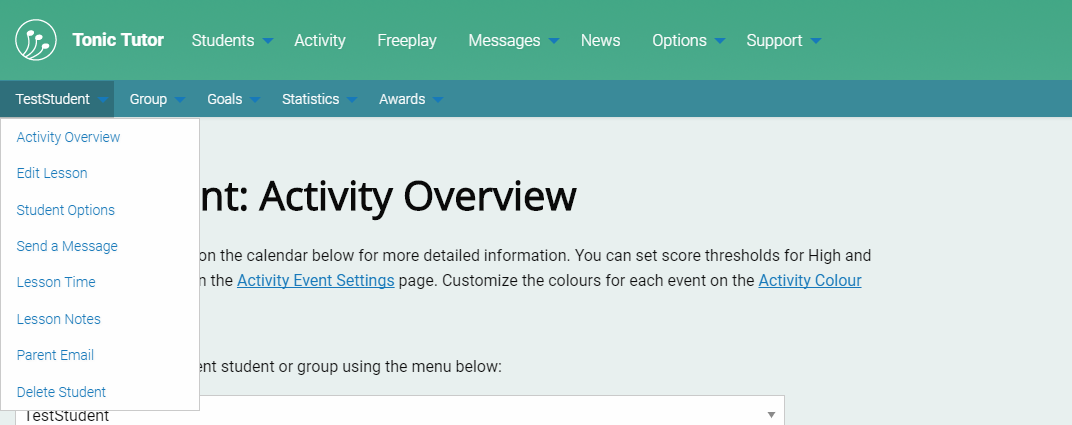
Some pages have a secondary menu that appears below the primary menu. Any page related to an individual student or a group will include a contextual menu that gives you access to pages and actions related to the student or group, allowing you to quickly navigate and make changes, focusing on the student or group.
The Activity Overview
The biggest new addition is the Activity Overview, a summary of all of the important information on what's happening on Tonic Tutor. You can select any item on the calendar to view more detailed information. On mobile it is displayed as a list, but on larger devices it is displayed in a calendar format.
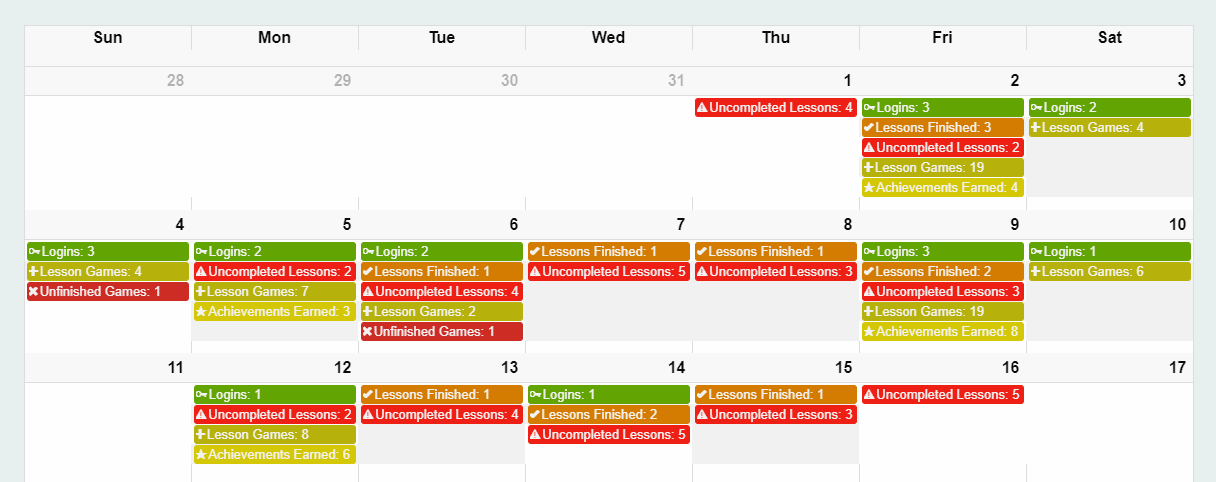
Two drop down menus let you choose a month and year to view. You also have the option to filter what type of events show up by selecting or deselecting any of the items in the display options menu. Any time you update the date or display options, you will need to select the Update Calendar button before the information on the calendar will be updated.
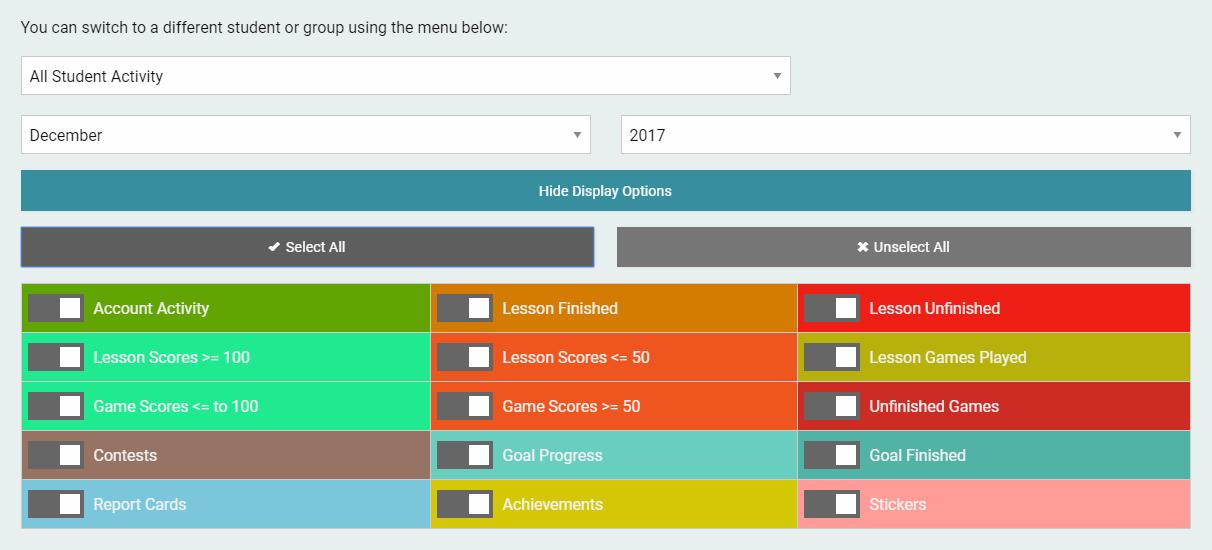
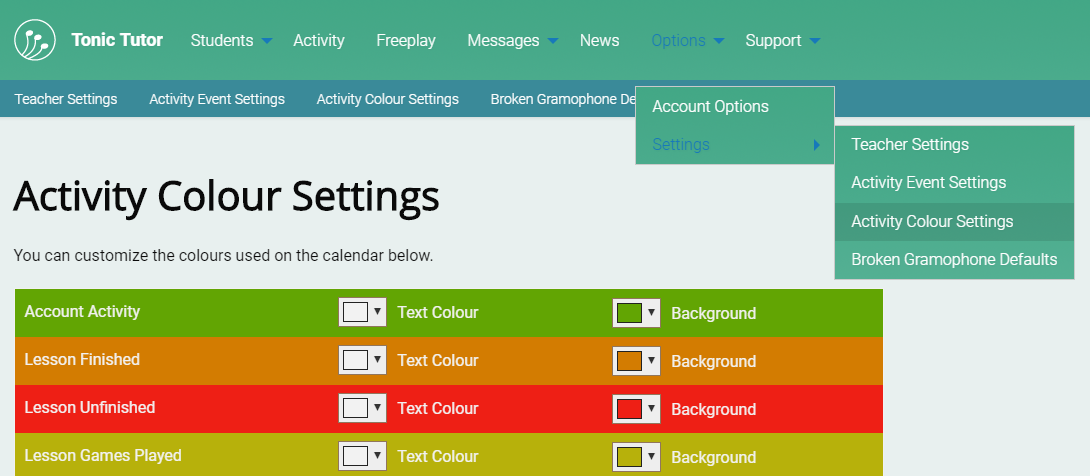
The Activity Overview for all of your students is located in the Student menu in the main navigation at the top of the page. Both students and student groups have an activity overview you can use to get an idea of what a student or students in a group have been doing. One final neat thing: you have the ability to customize the colours associated with each event on the calendar. You can access those options by selecting Options > Settings >Activity Overview Settings from the main menu.
My Students
The My Students page is very similar to the Student Index on the old version of the site, but it's a bit more streamlined. You can still see a student's lesson progress and the current lesson score to get a quick overview of lesson progress. You might not see all of that data immediately, because the page uses "lazy loading": this allows us to load the My Students page much more quickly, since we don't ahve to crunch all of the statistics before the page loads. Each time you go to your My Students page the stats will refresh if more than five minutes have passed. Another new change is that the student list is no longer paginated, which means you will always see all of your students listed on a single page (no more navigating from page to page trying to find a student). Let's take a look at the information listed for each student.
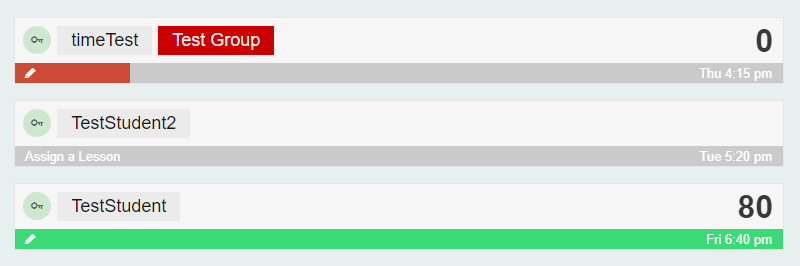
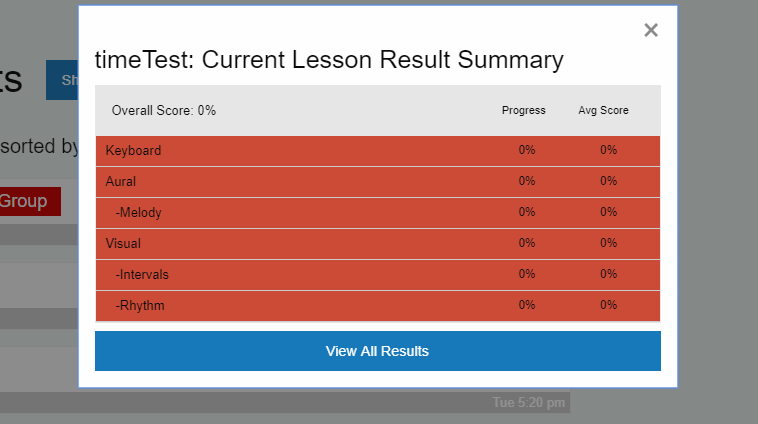
Let's look at the top half first. Each student has a green key icon next to their name by default. If you hover over the icon with your cursor (or tap it if you're on a touch enabled device), you'll see the most recent login time for that student. If you don't want to see that icon, you can turn it off in the Teacher Settings options in the Options > Settings menu. If you select a student's name, a student menu for that individual student will appear on the left side of the screen. If a student is in a group, a button for the group will appear next to their name. Selecting the group button will open a group menu. The large numbers along the right side of the list are the current lesson score. If you select one, a summary of the associated students's current lesson will appear, giving you a breakdown of score and progress by category (pictured below). If you want to see results for each individual game, you can click on the View All Results button that appears above the summary to go to the Current Lesson Results page for that student.
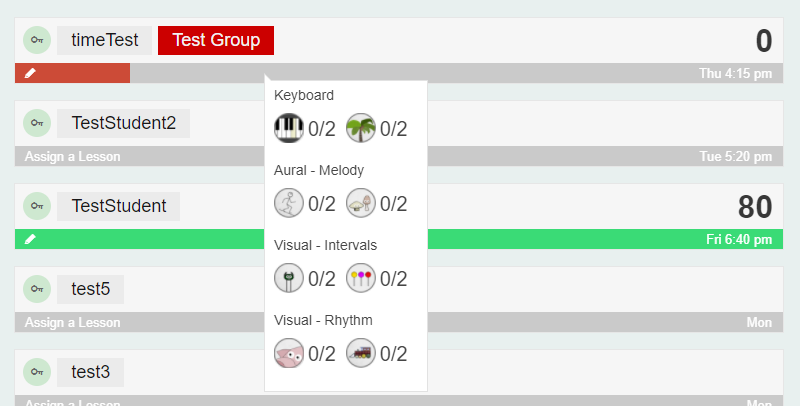
Clicking or tapping anywhere outise the summary closes it. If you're on a smaller device and the summary takes up the full width of the screen, you can tap on the X icon in the top right corner of the screen to close it. Now let's look at the bottom bar (below each student's name). If a student doesn't yet have a lesson assigned to them, the bottom bar will be grey and you'll see the text Assign a Lesson (or Assign a Group Lesson if the student is assigned to a group). If you click on that text, you'll go to the Assign a New Lesson page. If a student has a lesson, you'll see a coloured progress bar. The longer the bar, the more progress they've made in their lesson. The colour also changes as they complete more of their lesson: it starts out red, turning orange, yellow, and green as they get closer to 100% completion. It's a very quick and easy way to get a sense of the overall progress for all of your students on a single page. There's a little pencil icon that appears at the start of the progress bar: if you click on that you go to the Edit Lesson page. You can also get to the edit lesson page from the student menu if you click on the student's name, but the pencil icon is a quick shortcut that we've added to make editing a lesson a little bit easier. If you hover over the progress bar, a summary of the games that have been played will appear (pictured below). If you're on a smaller device like a phone, or a touch enabled device, you'll need to tap on the progress bar to see the summary.
Finally, there's the time that the student's lesson will reset on the right side of the progress bar. This will appear even if a student doesn't have a lesson assigned to them (it's not resetting anything, but you can still modify it). If you select the time, you'll go to the Lesson Time page where you can assign a new time to the student. Let's look at the options you have for filtering and sorting your students.
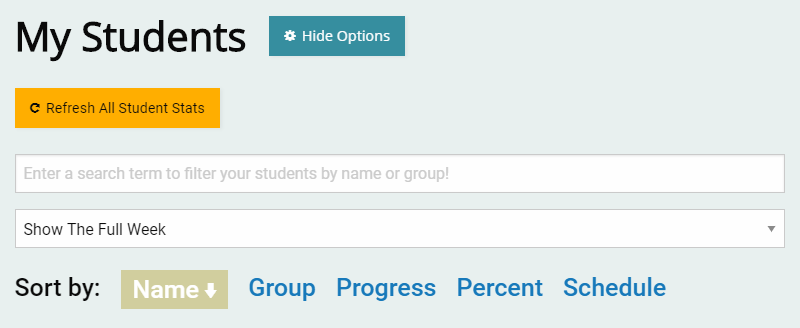
The options are displayed by default, but you can select the Hide Options button to hide them. The Refresh All Student Stats button will refresh all of the student stats manually. The input below that allows you to filter the list of the students: enter part of a student name or group and the list of students will update instantly with any students that match the search term you enter. Below that is a drop down menu where you can filter the your students by the day of the week their lesson resets. By default it shows the full week, by you can select a single day. This it makes it really easy to focus on the students you teach without having to parse through your full list of students. Finally, you can set the way your list of students is ordered by selecting any of the options in the Sort by: menu. The active sort option will have a gold box around it; the arrow next to it indicates whether the order is ascending or descending. Clicking (or tapping if you're on a touch enabled device) a sort option that is already selected will toggle the sort order.
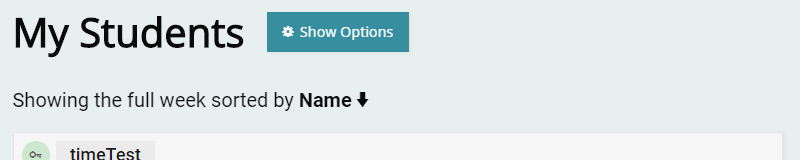
If you hide the options, you'll see a summary of how the list is being filtered and sorted. You can always select the Show Options button to show the list again. All of the options (except the search term filter) are persistent, so the order and day of the week you select will stay the same until you modify it, even if you log out of your Tonic Tutor account.
Adding/Deleting Students
The way you add students has changed. The most significant change is the removal of the activation phase for new student accounts. Students will no longer have to log in and choose a new username and password before their account is active, it's active as soon as you add them. You still have the option to add up to 10 students at once, but there's also the option to add a single student.
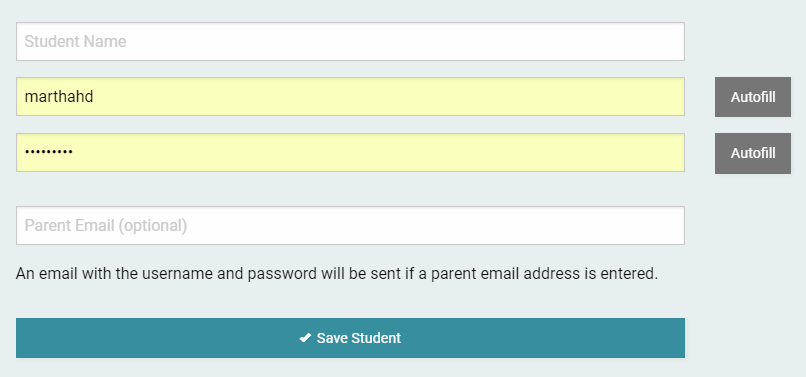
Adding a single student gives you the option to enter a username and password for the student manually, or you can select the Autofill button next to each input to generate a username or password randomly. There's also the option to enter a parent email. This will automatically email the username and password to that email when the account is created. The parent will also have the option of opting into email alerts when a student's lesson is close to resetting and a monthly summary of the student's lesson progress. They won't receive any emails unless they choose to, and we never spam those accounts. They have the option to opt out of the email alerts at any time by logging into the student's account and turning the email alerts off on the Options > Account Options page.
There's also the option to add up to 10 students at once, which is useful for classrooms where entering students individually would take too long. The usernames and passwords are generated automatically, but they will be emailed to you directly for your reference.
Finally, you now have the option to delete multiple students at once. Deleting a student is permanent and cannot be reversed. All of these options are availabled under the Students > Add/Delete Students menu in the main navigation bar.
Assigning Lessons
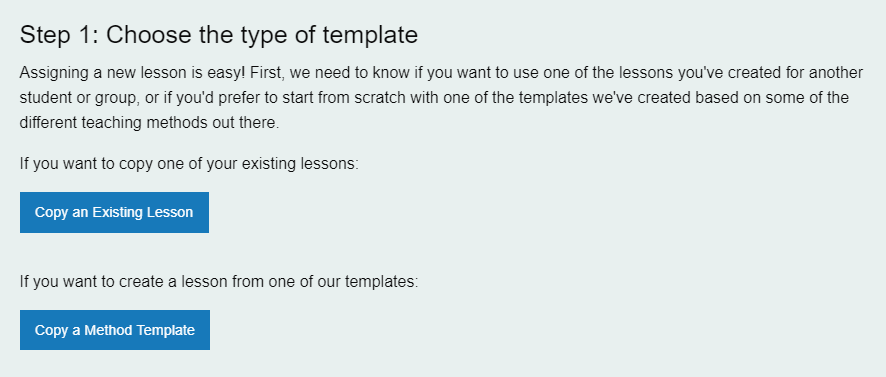
We've broken up the process of assigning a lesson into steps. You start by choosing whether you want to copy one of your existing lessons (which gives you the option of selecting a student lesson, a group lesson, or any lesson template you've created that isn't associated with a student or group), or if you want to create a lesson using one of the Tonic Tutor method templates.
If you copy one of your existing lessons, all you need to do in step 2 is choose the lesson you want to copy from the drop-down menu and select the Submit button.
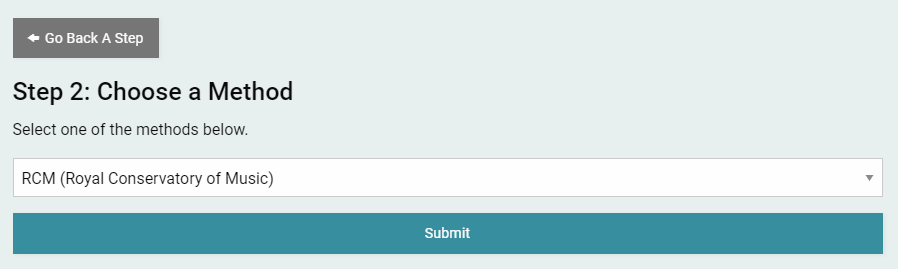
If you choose the option to copy a Tonic Tutor method template, you are taken through a few more steps. You need to select a method (Step 2), select a level (Step 3), and finally in Step 4 you select a lesson type. The type for the RCM and Music Development Program methods include lessons tailored to specific goals (such as Ear Training or Note Reading); the General type assigns all applicable games. Most other methods only include the General template type.
At any time in the process, you can select the Go Back A Step button to go back to the last step. Once you get to the final step, selecting the Submit button will copy the lesson and redirect you towards the Edit Lesson page where you can modify the lesson if you wish.
Editing Lessons
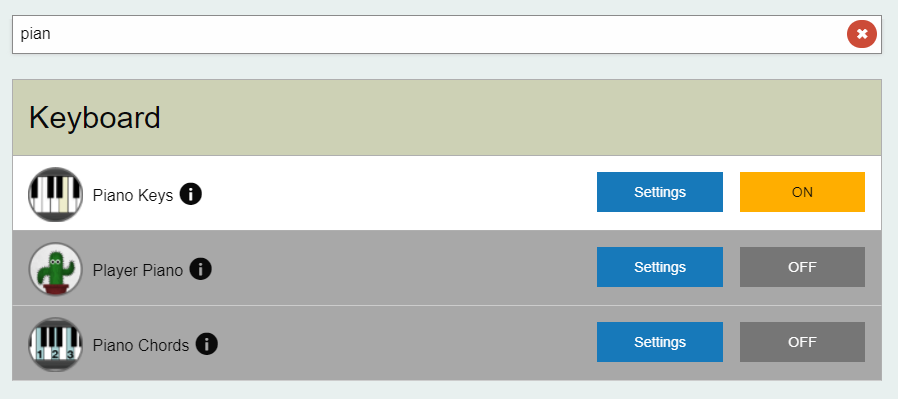
The Edit Lesson page structure hasn't changed a lot, but we've added in some small changes that we hope will save you time. The first thing you might notice is that there's an input near the top of the page, above the list of games. That works similarly to the input on the My Students page — entering a search term there will filter the list of games instantly, no more scrolling down the full list of games trying to remember where a game is! Games have some search terms associated with them (including their name and category along with some other search terms). If you can think of a search term that would make sense, please let us know, we'd be happy to add it.
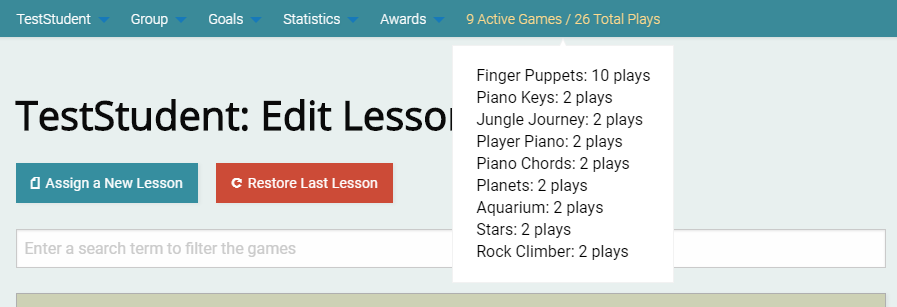
Another feature we've added is an active game count. It appears in the secondary menu at the top of the page. As you turn games on and off, that number will change. If you hover over the active game count (or tap on it on touch enabled devices), a list of the active games will be displayed.
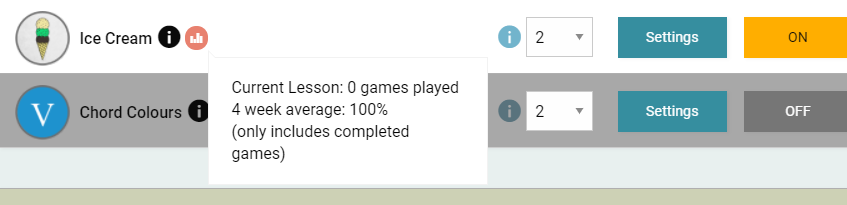
We've also added an icon that will display a summary of the scores for a game. If it's part of the student's current lesson, the current score is displayed (the average score for completed games, not including zeros for unplayed games). If there are any scores from the past month, the average of those scores will be displayed as well (this only includes lessons that are finished, it doesn't include the current lesson results). The icon only displays if scores exist. You can hover over the icon (or tap it if you're on a touch enabled device) to see it.
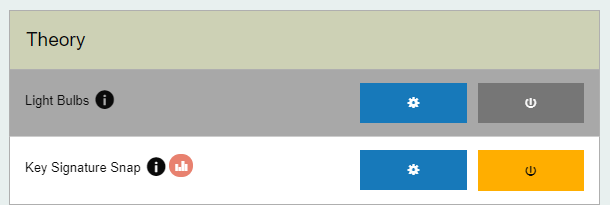
The mobile version of the Edit Lesson page changes a little bit. Icons replace the text, but the buttons do the same thing. The blue button with the gear icon opens the Game Settings page, while the yellow/grey button switches the game off and on.
Game Settings
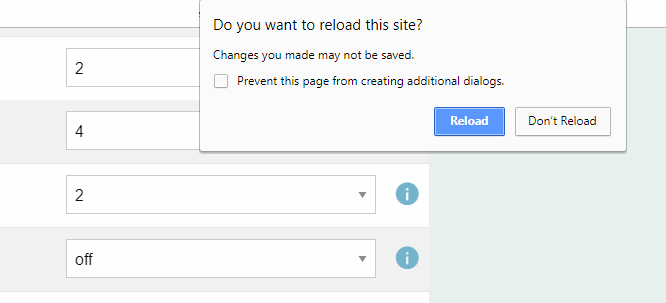
The only major change to the Game Settings page is that we've added in validation while you're changing the settings. Before, you had to load the game to make sure the settings were valid and the game would work properly with no errors when the student went to play it. Now, if the settings aren't valid, you'll see a message pop up.
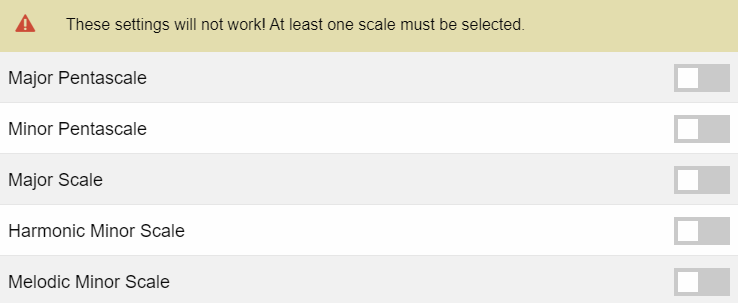
You'll also see a warning if you try to reload the page or navigate away from the page while the settings are invalid. This alert will look a bit different depending on what browser you use, but it's the same basic warning that if you leave the page, the current settings won't work when the student tries to play the game in their lesson.
Contests
We've removed Goal contests — since they relied on teachers having to create and manage goals separately, they're a bit too finicky and confusing. We also gave more control to teachers, allowing them to remove and add students once a Contest has started, removing the old suspension system we had in place.
Stickers
You can now send multiple stickers (up to 9) to a single student. The option to send multiple stickers to all of your students existed on the old site, this adds it to the single student sticker page in the Awards section of the student menu. You can also see if a sticker has been claimed by a student on the Awards > Stickers page.
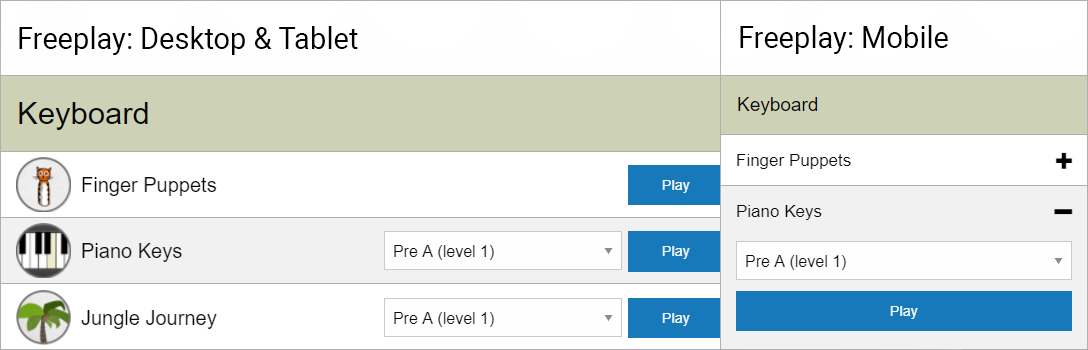
Freeplay
The ability to disable Freeplay completely has been added. That means if a student finishes their lesson, they'll have access to their account, but they won't be able to use Freeplay or play any games until their lesson resets. There's an individual setting to turn Freeplay off on the Student Options page for each student (accessible from the student menu), and a global setting on the Options > Account Settings page which overrides the individual student settings.
You can also filter the games using the input at the top of the page (which works similarly to the filter on the Edit Lesson page). It only filters based on the game name on this page.
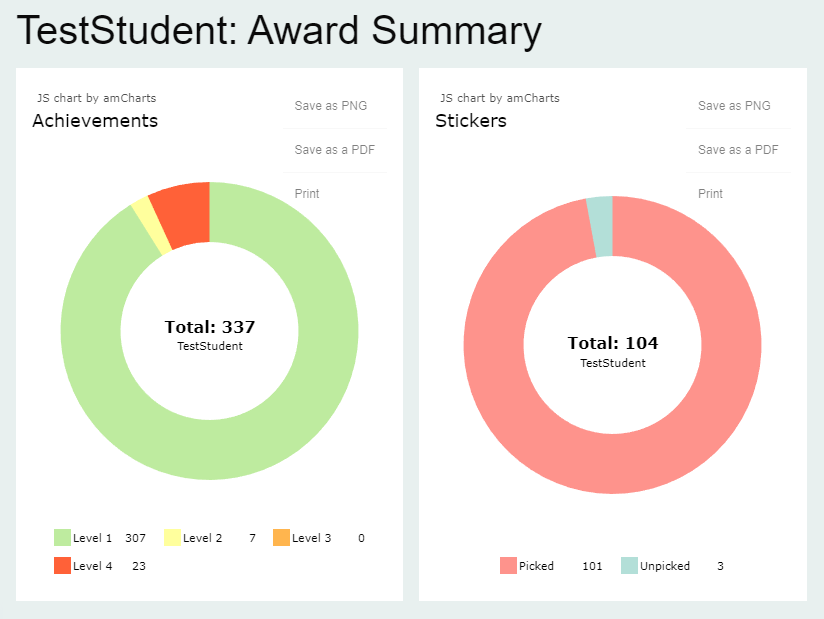
Awards Summary
The Awards Summary now uses charts to give you a visual overview of a student's Achievements, Stickers, Goals and Medals. Selecting the total in the centre of the chart or any section of the chart will navigate to a page with more detailed information on the awards. You can save each individual chart as a PNG, a PDF, or just print it out directly (if you're on a computer or a device that's connected to a printer).
Managing Subscriptions
You can still downgrade and upgrade at any time and get a prorated credit for any time remaning on your existing subscription. We've added some more information to the page related to your subscription: you can see the date you signed up, the credit card you have on file (with the expiration date), and the billing address you used to sign up. This is all for your reference. In addition, if you change your email address on the Tonic Tutor website, it will automatically change it in your Chargify subscription profile.